Showing posts with label diy. Show all posts

Wednesday, April 15, 2015

A simple DIY gift box idea

20140517-IMG_2319

I love giving gifts and thinking of ideas to fancy up simple gifts. Here is something I have tried which I wanted to share earlier but changed my mind when it seemed too common sense and simple! Well, I’m still doing it anyway because maybe one of you hadn’t thought of this before? I hope so!

20140517-IMG_2299

20140517-IMG_2303

We all have these random gift boxes that come with some purchases or even with gifts we get. It would be totally fine to use them for gifts as they are, but it feels so much more special with this simple idea.

All you need is : a hot glue gun / any kind of ribbon, lace, fabric strip / the gift box you’d like to repurpose

Just cover up the store name or whatever with the lace/ribbon/fabric etc using the hot glue gun and viola, you’re done!

(Of course this really works with simple gift boxes which don’t have too much going on them, but it would be fun to improvise!)

20140517-IMG_2316

Please tell me you had not thought of this before?

Lol.

Thanks for reading and lots of love.

20140517-IMG_2305

20140517-IMG_2311

Monday, September 9, 2013

Displaying Photos in Jars.

20130821-43

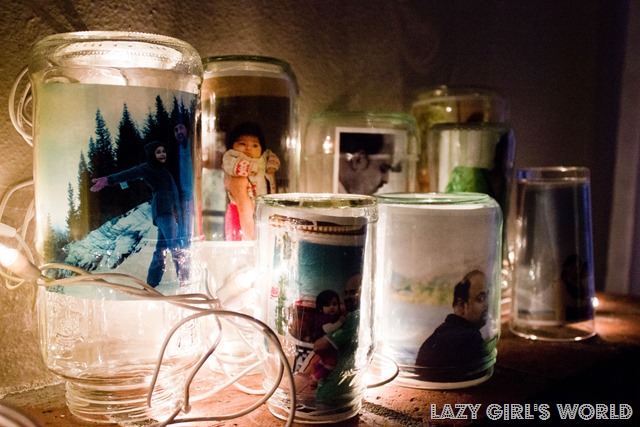
Happy Monday morning you guys :) Some of you noticed our little photo display from the post on Bilal’s birthday and I thought I’d share more of that today. I am always on the lookout for ideas to display the gazillions of pictures I take and the many that I have printed out. This idea has been around for a while and recently when a friend mentioned it, I finally made a photo jar display on the mantle. I love that it is a super simple idea and looks so pretty.

20130821-4620130821-88

You can make your own version of this to display photo memories for a specific occasion or use it to decorate a corner. I find it looks best when you have a variety of sizes for the jars.

Elsie Larson also did a version of this here and do check out the other amazing ideas to display the photos you take.

(The jars I used are from various items like used up candles, peanuts jars, juices, cream cheese, pasta sauce. You can soak the jars in warm soapy water to get the stubborn labels off.)

20130812-28

Thanks for reading and hope your day is amazing.

Wednesday, June 19, 2013

Anya’s room. The in-between phase.

Remember Anya’s room when it looked like this? I am embarrassed to see the date on that post because it is almost a year later and I still haven’t posted about her room! ANYWAYS. I finally took pictures and I’m happy to tell you, it will definitely be up next week. So do sure to check back if you'd like to take a look.

For today, I thought it would be fun to show you the in-between stage. Here are a couple of shots from before the paint job and after removing the molding running across to discover the room had been once been blue.

2012-06-25 001

2012-06-25 003

And here it is when the paint was done. It was a slight change but one that made a world of difference. I ended up repainting the white too with a brighter shade and then the accent wall in my favorite shade of grey. I was so proud of myself for doing it all on my own! Hehe.

We just did up the room a little bit for guests that were going to be staying for a week soon after. Here are some glimpses of our makeshift guest room.

2012-06-30 010

2012-06-30 015

2012-06-30 019

2012-06-30 020

Check back next week for what her room looks like now. Here is the slight teaser I posted once.

Thanks for reading and for stopping by!

Saturday, March 16, 2013

Too-easy paper envelope DIY

I will always love paper crafts. Something so relaxing about cutting and pasting all those pretty papers. That is why I have the tendency to be a serious paper hoarder. I have had a problem being able to throw any packaging, tags, catalogs and even advertisements that look good to the eye. Sigh. ANYWAYS :p

In fact all those décor and fashion catalogs are perfect for so many paper crafts. Here’s a quick and easy idea for pretty paper envelopes to use for anything. It is common sense actually but since I had never thought of it till I read it somewhere, I thought I would share for those who are like me.

This would also make a great craft for kids.

20130314-20130314-IMG_0948NatCam

I was inspired by this little paper flap that the Anthro member card came in. And this Madewell catalog that just arrived in the mail this week.

So here’s the thing. Did you know that you can turn any paper envelope, bag, cover into a template and make your own just like that? Just some pretty paper, scissors and glue is all you need. Take a look?

20130314-20130314-IMG_0941NatCam
just for the information, those scissors are for Anya’s Play Dough and were not used to cut this. They just looked cute ;)

Just carefully unglue and unfold the paper you want to copy and lay it on the one you want to make yours with. Trace it and cut it, being careful about which side will be visible and which will fold inside. And then you just use your template as a guide to fold and glue and you’re all done.

ThumbaCam_2013-03-15_15-16-26 (1)
Please excuse the terrible quality. I used my cellphone for this one.

You can use this to make literally anything from envelopes to gift bags to cd covers even.

Here is the end result. Not sure how I am planning to use this yet.

It could be a place to keep all my pictures organized in my wallet.

20130314-20130314-IMG_0947NatCam
Nadiya, I need a picture of you. And what kind of a mom am i  who doesn’t have her daughter’s picture in her wallet! lol

Or a place to keep all those gift cards/rewards cards etc that keep taking over my wallet

20130314-20130314-IMG_0944NatCam

Or just add a flower to it and it would make a great way to give a gift card.

20130314-20130314-IMG_0945NatCam

So easy and too simple to make for a real DIY post but well. Let me know if you make your own. For Anya’s birthday last year, I used this method to make little gift bags for the favors.

Thanks for stopping by! Hope your weekend is awesome!

Monday, March 4, 2013

Hello Monday. Hello sunshine and a DIY share.

Hello all you sweet people. It has been a beautiful sunshine filled Monday for us in Seattle. Cant tell you how much we needed it.

Anya and I made a trip to the library for story time and then ran some errands. And since then we’ve just been basking in the sun that is filling up our little house.

2013-03-01 001

Over the weekend, thanks to the husband, the shelves are finally up in Anya’s room and I cant wait to share her room FINALLY (I know!!).

I wanted to share this quick project I had done many months ago, but only now found a place for it. The hand drawn cushion cover! It was inspired by a few projects I saw on Pinterest (of course!) including this and this.

All you need is a black fabric marker, a plain cushion cover (I had bought this from Target 2 years ago and it was sitting in the closet since then), and a little design in your head. Slide a cardboard or something under the fabric layer and just draw on. No need for it to be perfect. If you look closely you'll find uneven lines at many points, but I like to think these add to the charm;)

2013-03-01 004

2013-03-01 006

Fabric markers are so much fun to use. A couple years ago, my sister Nadiya came up with a fun idea for us. When she came to see us in early 2011, she brought along plain white t-shirts for the three of us, along with fabric paints, markers etc. We spent a fun evening together, sitting on our dining table, planning what to do with our shirts, chatting, making fun of each other’s shirts and finally making our shirts. It was the most fun the three of us have had in a many years. I tell you my sisters are super cool :)

2011-04-11 008

DSC_0034
Excuse the quality of these pictures, we didn’t know I’d be sharing them on the blog someday. lol

Now excuse me will you, I have to go get some dinner ready for tonight!

Thank you so much for stopping by!

Tuesday, February 26, 2013

Celebrating Anya’s 2nd

2013-02-18 Anya is 2 MA 241

If you follow this blog, you probably know that we just celebrated a 2nd birthday around here, and also how baby’s birthday was spent. I thought I’d share some pictures from her big day too, specially for you guys!

Still cant believe this little piece of us is 2 already.

2013-02-18 Anya is 2 MA 1402013-02-18 Anya is 2 MA 0142013-02-18 Anya is 2 MA 135

The balloon surprise was waiting for her when she woke up in the morning! I had run to the grocery store at 11 pm the night before to get these, while my husband kept an eye on our sick little sleeping baby. These entertained her all day and are still floating around the house randomly.

2013-02-18 Anya is 2 MA 062

Handmade card inspired by some paint chip DIY art I had seen on pinterest.

2013-02-18 Anya is 2 MA 1512013-02-18 Anya is 2 MA 185

Added some last minute decorations around the place, twinkly lights, paper streamers, homemade confetti using cut up tissue paper in vases for some quick color. And of course a little birthday message on the chalkboard.

2013-02-18 Anya is 2 MA 1552013-02-20 028

I bought some plain party hats and had planned to fancy up one for the birthday girl. But taking care of sick baby didn’t leave much time for that. A quick tissue paper fringe edge layered in different colors had to do, and it actually looked quite festive. 

2013-02-18 Anya is 2 MA 2332013-02-18 Anya is 2 MA 268

And the cake! I had been dreaming about a pastel colored rainbow cake for a long time. Loved how it came out. I used Wilton’s gel food colors. They’re so bright. Just a drop or two were enough for each layer. Because I’m lazy like that, I used a white cake packaged cake mix. Just divided the batter into four equal parts, added the food colors and baked them.

The icing was made using this recipe I found on pinterest. I had tried it for her birthday last year too and loved it because it is not too heavy.  Oh and incase you have never frosted a cake before like me:p, this tutorial helped me a lot.

2013-02-18 Anya is 2 MA 160

Thanks for being a part of our little family celebration. Xoxo.

Oh and incase you are a new follower and missed out on her birthday last year. Here it is.

Tuesday, February 5, 2013

DIY Bauble Necklaces

Just a quick little DIY share for today. I had my eyes on this project for a while. The inspiration came from here and here. The links give tutorials which you could use if you wanted to try this quick project.

Because I loved how they turned out, I ended up gifting these to my two sisters.

Take a peak?

2013-01-11 Islamabad 0762013-01-11 Islamabad 069

I personally loved this next one, the color block bauble necklace.

 2013-01-11 Islamabad 0962013-01-11 Islamabad 107

Thanks so much for stopping by!

2013-01-11 Islamabad 111

(With special thanks to my beautiful sisters for modeling these for the blog)

Tuesday, December 11, 2012

This season <3

2012-11-13 019

We don’t officially celebrate thanksgiving or Christmas. For us the closest thing to these celebrations are our Eids. However living in the US, there is something about this time of the year that does resonate with us. The magic all around might be to blame for it partly, but add the shopping deals, the twinkly lights shining through the grey everywhere, the holiday songs echoing all around, and how can you not fall in love with the season!

But seriously more than any of that, I love the concept behind some of these traditions. Like how thanksgiving is a day to give thanks, a day to celebrate the special people in our life. To give thanks for all that we are blessed with, material as well as immaterial. And then the tradition of buying gifts for everyone around you for Christmas. I especially love how both these holidays are all about family and togetherness!

Since I’m a big believer in taking the best from both worlds, me and my husband like to celebrate the holidays in our own way. We buy holiday gifts for each other and our family back home, we try to make a trip back to Pakistan to spend some time with loved ones, we enjoy a lovely thanksgiving lunch at some friends’ house, we celebrate snow days and we try to bring some of the magic into our lives.

Now that we are parents of a little one that will possibly feel more American than Pakistani, it is important to me that we find a way to connect these two worlds and bring the best of both of them in our lives. My dream for her always is that she feels lucky for her multicultural upbringing. That she feels connected to these two cultures so easily that this difference, instead of a challenge becomes a beautiful advantage.  

2012-11-13 017

So through all the craziness of packing and shopping for my Pakistan trip, I wanted to bring some holiday cheer into the house. I saw this via pinterest and had been wanting to try it. Above is my version and even though they looked much pretty in my mind than in real, I think they will do:). Added a little washi tape bunting over our chalkboard along with a joyful message and our little house is ready:)

2012-11-13 0102012-11-13 016

How do you try to balance the culture you come from, and the one your kids are growing up into? I would love to hear your ideas.

2012-11-13 012

Thanks so much for stopping by!

2012-11-13 011